After much "pecking" from a friend (gosh....I can still hear her click-clacking in the back of my mind ...heehee..) , I finally get the courage to create my very own blog. I was hesitating at first as I am afraid I might not have the perseverance to see it through... Well... then I tell myself...'At least I have to try'.
First I have to decide what I want to post at the blog. My finished craftwork, my on-going works, my wishlist (maybe....). Next Blog name. Getting a unique name for this blog is also a fun process for me and my friend Cindy. 'MooMoo' is used as it is the id I practically used in all the stitching forums that I have joined. We then brainstorm on the blog name..... 'MooMoo', 'MooMoo Blog', 'MooMoo Stitch' , 'MooMoo Talk' , 'MooMoo Craft'..... We laughed at all the funny names we came out with. Then I come across this word MOTIF in one of the sewing craft website. The word looks cool and perfectly depict the blog's theme. So we combined the 2 words and come out with MooMootif.
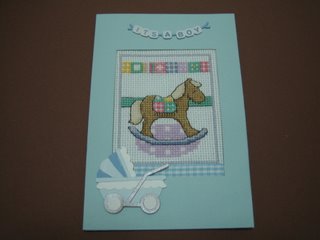
Currently I am crazy about hardanger and papercraft greeting cards. I have being buying alot of magazines and papercraft supplies lately. (oh dear..my wallet is getting lighter....). And I just subscribe to Cross-stitch Crazy. (Knock..Knock...) Really hope it is not a spur of a moment..... ;-p
I better download my pictures from the camera to the computer tonight.....
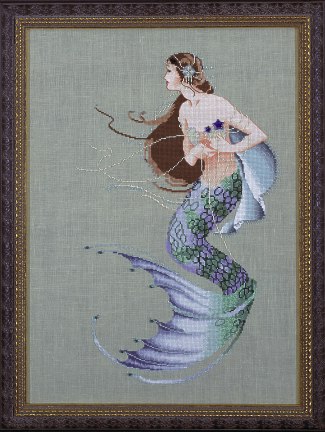 I am a big fan of Mirabilia Designs and I really love the contemporary looks and timeless depiction of Nora Corbett's designs. Nora, a designer cum painter, usually uses subjects like fairies, angels, queens, mothers .... graceful and elegant women posed in various romantic settings. Designs like 'Waiting For Ships' , 'Sleeping Beauty' , 'Fairy Moon' and 'The Forest Goddess' are some of my favourites. I chose 'Waiting For Ships' to be the first to sew. This 1998 design shows a heartbroken mermaid awaiting among the rocks and sea sprays for the return of her handsome sea captain. You can vision her long chestnut hair flowing gracefully in the deep blue sea... Her emerald aqua fins and tails shimmering brightly under the sun... Her heart yearning.... yearning for her lover to return....(sob...sniff...sniff....)
 OK.. now coming back to the real world... (blowing my nose with a hanky...) this stitchwork requires Kreinik metallic thread and beads by Mill Hill. It is also my first work with metallic thread and sewing petite glass beads on the fabric. I started stitching on the 32 count blue linen fabric since last April. The completed design area is to be 11"x17". Currently it is half-done. I have stop stitching it for a couple of months now as I find it tedious. I don't know why ... I just don't seem to be able to focus on this work. Dear me... it seems the mojo has worn-off???? HELP...! I need to charge-up again Bzzzz.... Bzzzz........ Bzzzz.... (5% charged) Bzzz... Bzzzz ( charging....) Bzzz..... Meanwhile I am going to spend more time with other smaller stitchworks :-p .